Setting up the appointments system
This section takes you through the appointments system configuration.
Set up Organisation
-
Select Config > Organisations
Ensure the organisation has a valid Default Postcode.
Configure the Zones required
-
Select Config > Scheduling > Zones > Zone set up
-
Select a Zone Division - Area, District, Sector.
Set up Customers
-
Select Config > Database > Tables > Customers > Column Sets
-
Add the following from the Available columns:
-
Geocoding status
-
Zone
-
Geocode Addresses
-
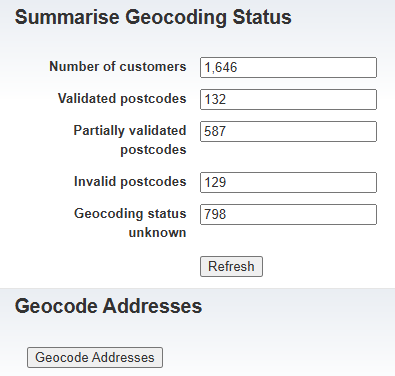
Select Config > Scheduling > Geocode Addresses
-
Summarise Geocoding Status will display the totals for validated addresses.
-
Select Geocode Addresses to begin the workflow.
-
Check the summary status for any partial or invalid postcodes.
-
Filter the customer screen on Geocoding status field for Invalid or Partial statuses.
Define Zones
-
Select Config > Planning > Zones.
-
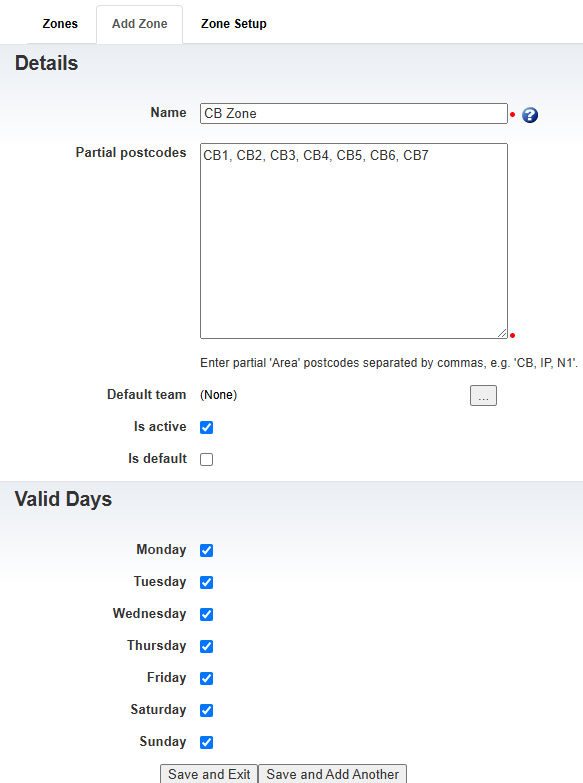
Click on Add Zone.
-
Enter the following information:
-
Name - name of the zone
-
Partial Postcodes - enter a list of partial postcodes, e.g. for Area it will be the first 2 characters of the postcode, CB, IP
-
Assign Zones to Customers
-
Go to Zone Setup and select Assign Zones.
-
The current zone summary is displayed.
-
Select Assign Zones to begin the workflow.
Assign Zones can only be accessed by TM staff. Please contact Support in case you need to run it.
Set up Skills
-
Select Config > Core Data > Skills.
-
Select Add Skill.
-
Enter the name of the skill (e.g. Carpentry) and select Save and Exit or Save and Add Another.
Set up Booking Types
-
Select Config > Master Data > Booking Types.
-
Select Add Booking Type.
-
Enter the following details:
-
Name - The name of the booking type e.g. Carpentry and Plumbing.
-
Default Duration - The default duration in minutes e.g. 60.
-
-
Select Save and Exit.
-
Select the newly created Booking Type.
-
Under the Rules section enter the following:
-
Skill - Select the skill required.
-
Validation Mode - Select whether the skill is Mandatory or Preferred.
-
-
Select Add Rule, repeat the process to add multiple rules.
Set up Resources
-
Select Resources.
-
Select a Resource.
-
Select the Planning tab.
-
Enter a valid Start Postcode (This is validated when leaving the field), select Save Changes.
-
Under the Skills section enter the following:
-
Skill - Select the skill required
-
Select Add Skill, repeat the process to add multiple skills.
-
-
Select the Zones tab. There are two sections on this screen:
-
Preferred Zones - This lists the zones that the resource is preferred to work in.
-
Allowed Zones- This lists the zones that the resource is allowed to work in.
-
-
Selecting a preferred zone automatically selects the allowed zone, but not vice-versa.
-
Select an organisation - zone from either section.
-
Select Save Changes.
Build Travel Time Matrix
-
Select Config > Planning > Build Travel Time Matrix.
-
Select Build Travel Time Matrix to run the workflow.
This travel matrix is a simple x/y travel time matrix used for testing. A detailed travel matrix for a given client is provided separately by Totalmobile.