GRS Web Features Overview
The GRS Web UI includes a number of features that help you to navigate and use the application, including:
-
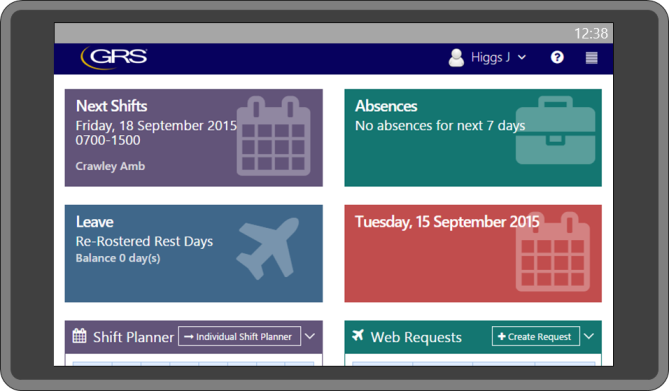
Responsive Web Layout — the responsive design enables you to use GRS Web on computers, mobile phones and tablets
-
Date Picker — to filter data by a specific date/time or a date/time range
-
Location Picker — to select, search for, and add favourite locations
-
Person Picker — to search for a person by name, navigate through the results, and select a person to view their profile
-
Export Options — some pages allow you to export data to save as a file to a network or local storage drive
-
Grid Tables — display data that you can sort, filter and group to organise the data
-
Pivot Tables — some pages contain pivot tables that you can use to sort, filter, and analyse large amounts of data
Responsive Web Layout
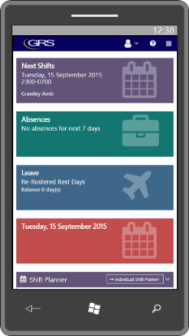
GRS Web has a responsive web design, allowing different monitors and devices to display the pages appropriately. The following examples demonstrate that the web page menus and content adapt for better display and navigation on mobile devices.
Date Picker
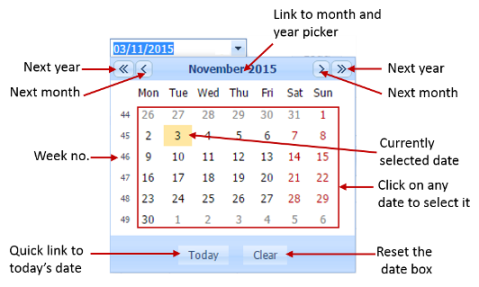
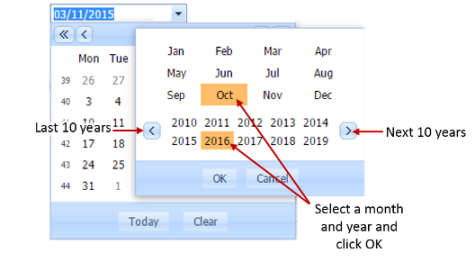
The following styles of date picker menus may be available, depending on the requirements of the web page that you are viewing:

To select a date:
-
Select the arrow at the end of the box. The date picker menu opens.
-
Select a date in the date picker.
-
The picker closes and the date you selected is added to the date box.
If the date range does not display the date that you require, use the navigation buttons to change the date range and select the date you require. It provides navigation buttons for year, month, and to navigate back to the current date and reset the date box.
Date/Time Picker
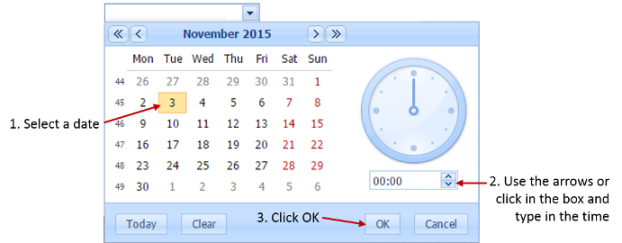
A date/timer picker provides the option to select a time for a more precise selection, may also be available on some GRS Web pages.
You can use it in a similar way, with the additional option of selecting a time using the up and down arrows or typing the numeric directly into the field. When you have selected the date and time combination that you require, select OK to confirm the selection.
Location Picker
Some GRS Web pages provide a Location picker menu.
To add a location:
-
Select the menu '...' button at the end of it.
-
The Location picker menu opens; it has three main areas:
- Location Name panel — contains the Organisation Tree
- Locations field — contains a search box and results list
- My Favourites field — contains the user's favourite locations
Select a Location
To select a location:
-
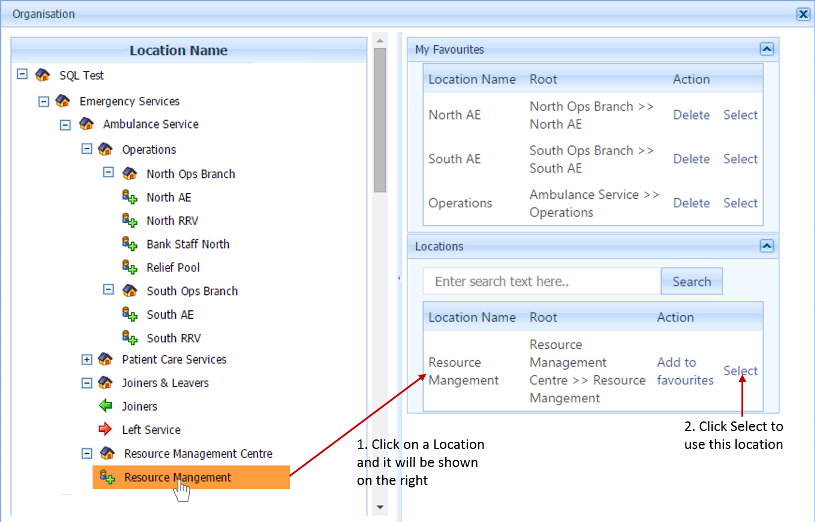
In the Organisation screen and in the Location Name panel, select a location.
-
The Locations box on the right now displays your selected location.
-
To use the location, click Select under the Action column.
Search for a Location
To search for a location:
-
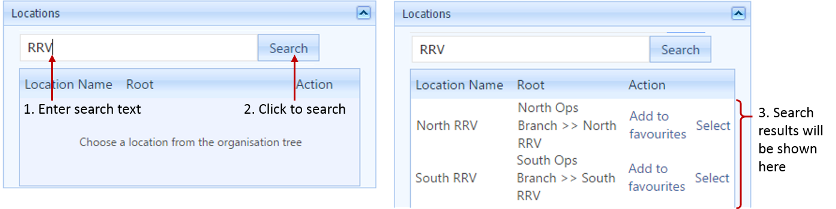
Enter text into the search box in the Locations box on the right of the Location picker screen.
-
Select Search.
-
The Locations box displays the search results, with columns for Location, Root, and Action. To pick a location, click Select.
Favourite Locations
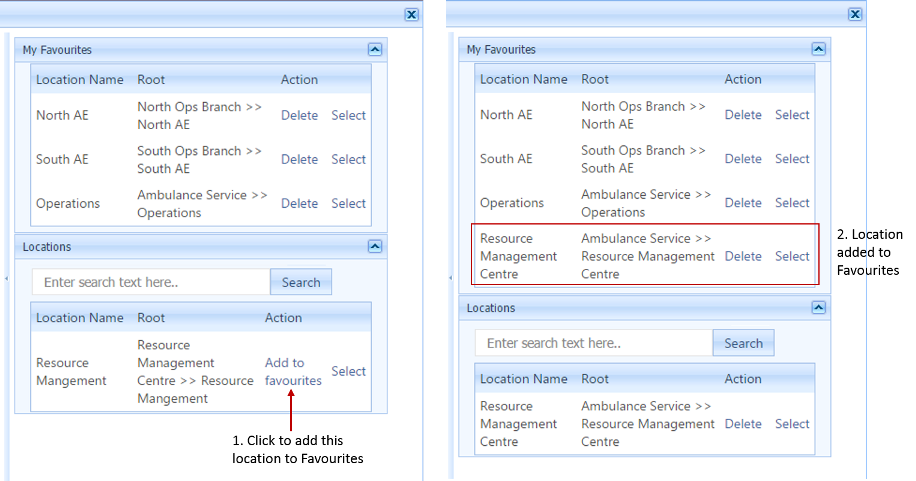
The Locations picker contains a My Favourites box and users can add or remove locations from here.
To add a favourite location:
-
Select the location in the Organisation tree or search for it using the search box.
-
When the Locations displays the location that you require, select Add to Favourites under the Action column.
-
Check that the location is displayed in the My Favourites box. Repeat these steps for other locations if necessary.
To remove a location:
-
Locate the location that you want to remove and select Delete under the Action column, next to the location.
-
Check that the location has been removed from the My Favourites box. Repeat these steps for other locations if necessary.
Person Picker
In some GRS Web pages, a Person box is available.
To add a person to the field:
-
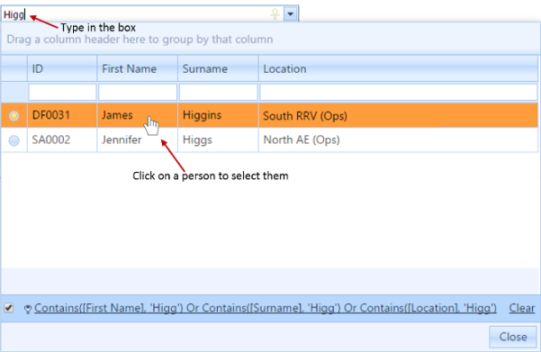
Select the arrow at the end of the box or type directly into the box.
-
The Person picker appears and displays any matching results. If you want to filter the results further, type into one of the fields, such as First Name, Surname, or Location. The picker menu includes several search and navigation options.
-
Select a person from the list and then select Close.
-
The picker closes. Check that the location is displayed in the and that the Person added to the box.
Search and navigation features in the Person picker
The Person picker menu provides the following search and navigation features:
- Page numbers and arrows — use the page numbers and arrows to browse the list of people and change the view:

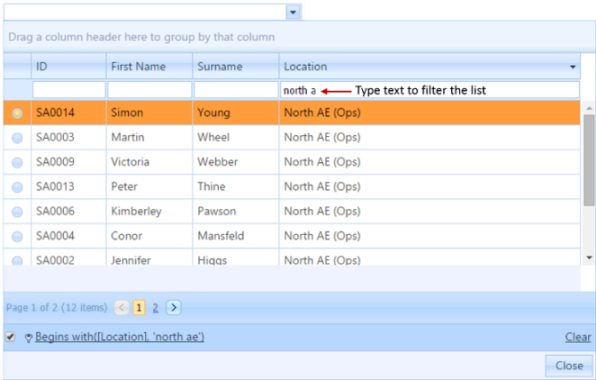
- Text search — enter text into a field above any column to filter the list of people:
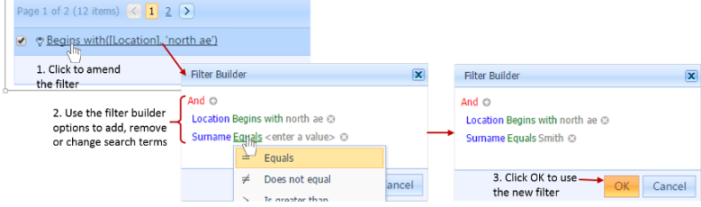
- Custom filter — select any filter text to create a custom filter:
Export Options
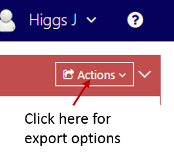
An Actions drop-down menu that contains export options is available at the top-right of the panel on many GRS Web pages.
To export data:
-
Select the Actions menu.
-
Select the type of export that you require from the list and, if prompted, select the location where you would like to save your document. Where a report has more than one tab, make sure to have the correct one in view before using the export feature.
Grid Tables
GRS Web Grid tables show data in a 'flat' format with options for sorting, filtering and grouping the data.
Sorting
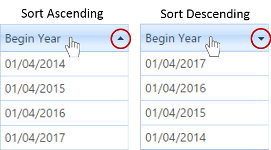
To sort data in tables, select a column header (data field). To reverse the sorting order, select the column header again.
Filtering
Filtering (or searching) may be available as a row of text boxes at the top of some tables.
To find a table entry, enter text into the relevant search box or boxes. This automatically filters the table to display only those rows that contain matching search terms.

Grouping
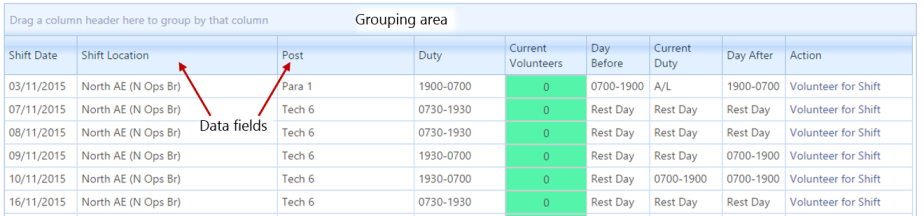
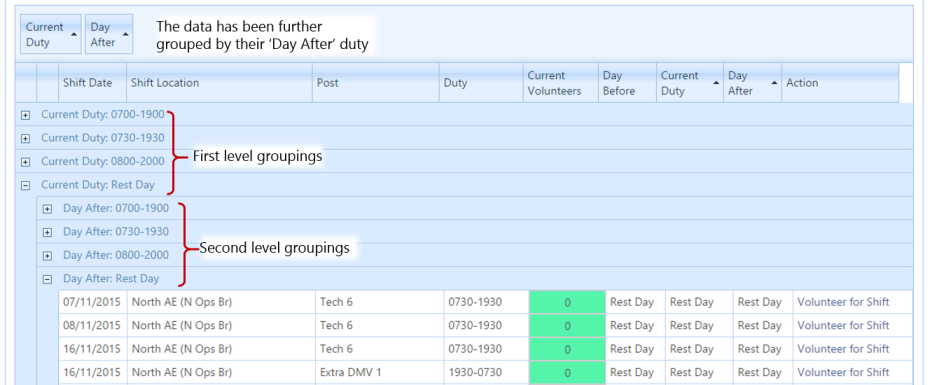
It is possible to group data within a table; where this is an option for a table, it displays a grouping area at the top. The following image is an example of a grid table that has the option for grouping data.
To group the data:
-
Select a column header (data field) and drag it to the grouping area at the top of the table.
-
When you have moved the field into this area, the table display the data grouped by this field.
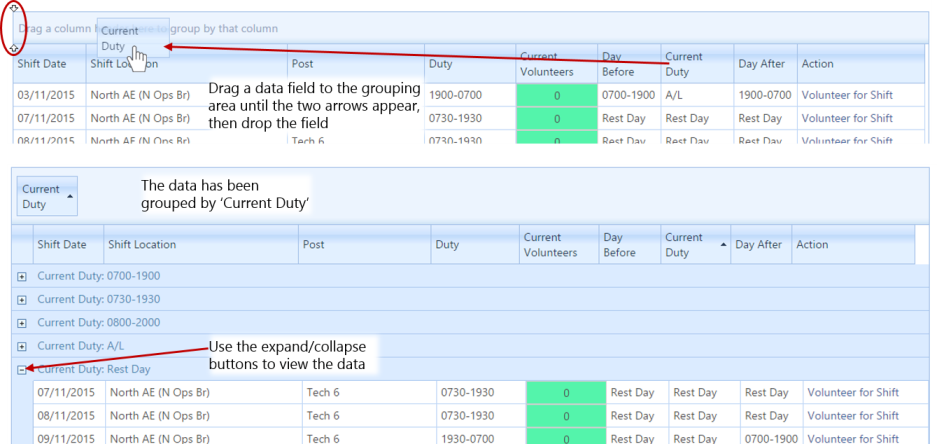
It is possible to use a number of fields in the grouping area at the same time to further organise the data.
In the following example, the user has organised the vacant shift data to show rows where both their current duty and the day after are Rest Days.
To remove a grouping from a table, drag the data field back to its original position in the table header row so that the white arrows are displayed.

Pivot Tables
Some GRS Web pages contain pivot tables. You can use this type of table to analyse large amounts of data by using grouped columns and rows to provide totals and subtotals.
You can drag and drop data fields into several areas on the report, changing the way the report displays the summary data. As a result, this can create meaningful reports and potentially reveal significant values.
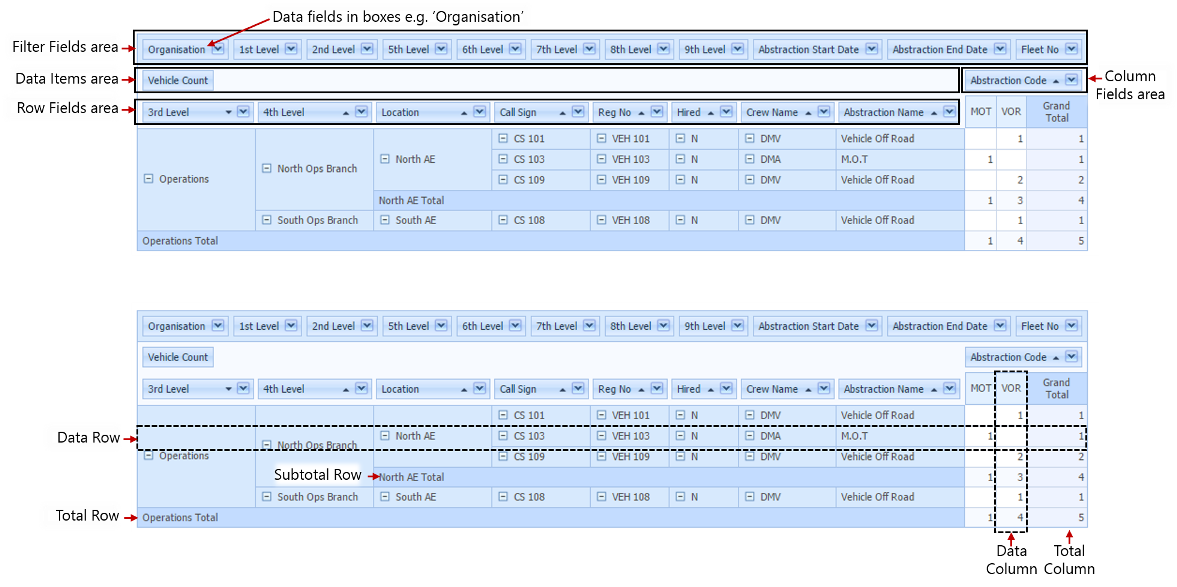
The GRS Web Pivot reports comprise four areas for data fields, which sit above the rows and columns of data. You can place the data fields in the following areas:
- Row Fields area — placing data fields here creates the data rows of the report
- Data Items area — placing data fields here represents the data (values) in the data columns
- Column fields — placing data fields here results in splitting the data (values) into additional columns
- Filter Fields area — placing data fields here effectively 'stores' them in this part of the report but you can still use them to filter the data in the table
Rearrange a Table
The pivot reports are arranged according to the type of information that they are intended to display; however, you can tailor the reports by moving the available fields.
To move the fields in the report:
-
Select a data field and, holding down the mouse button, drag the field to another the part of the report.
-
Release the mouse button when the two white arrows appear in the target destination.
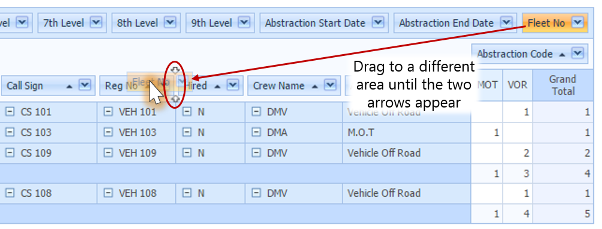
Moving some fields may result in value counts that are misleading or no data being shown. This happens when a user places the field in a part of the report that was not designed for displaying that type of data.
Sorting
To sort the rows and data:
-
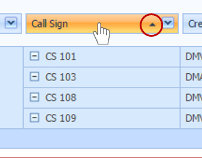
Select a column header field.
-
Select it again to reverse the sorting order. The sorting direction is indicated by the triangle indicator on the right of the header box.
Filtering
You can use any data field that is in view to filter the information that is available in the table, including those in the Filter Fields area.
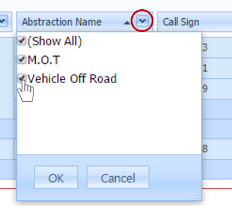
To filter the data, select the arrow icon in a data field and select the fields that you require.